
Alcohol inks create beautiful, unpredictable color in epoxy, and pairing them with a holographic vinyl name makes a tumbler that really shines. In this holographic epoxy tumbler tutorial for beginners, I’ll show you how I used Tim Holtz and Piñata alcohol inks, the simple brush trick I used to turn stripes into a soft smoky look, and how to layer holographic vinyl so the name stands out.
As an Amazon Associate I earn from qualifying purchases. Some links in this post are affiliate links, so I may earn a small commission at no extra cost to you.
Supplies You Need
- Stainless steel tumbler
- Rust-Oleum flat white spray paint
- Alcohol inks (I used Tim Holtz and Piñata inks)
- ArtResin epoxy
- Tumbler turner and silicone brushes
- Silicone measuring cups and a silicone mold for leftover epoxy
- Holographic adhesive vinyl plus Oracal 651 in matte black
- Cricut, transfer tape, electrical tape, gloves, and a respirator
Step 1: Tape, Clean, and Paint
I use electrical tape on the rim instead of painter’s tape because it doesn’t peel up and paint doesn’t creep under it. Wrap the rim once, then overlap and wrap again until the very top is covered. Cut the tape and fold a little “pigtail” at the end so it’s easy to pull off later. Clean the cup with rubbing alcohol (any percentage), then spray paint the whole cup flat white outside.
Step 2: Epoxy and Alcohol Inks
Put on gloves and a respirator, mix your epoxy, and brush it onto the turning cup. Then add drops of alcohol ink. Since I had leftover epoxy from another project, I poured the extra into a silicone mold so nothing went to waste.
Step 3: Turn Stripes Into Smoke
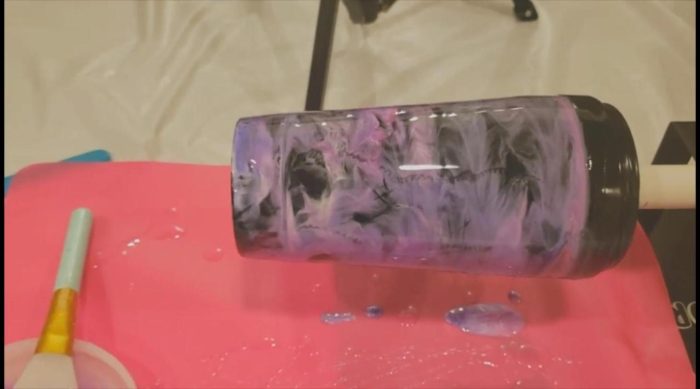
As the cup turned, the inks spread into straight lines around the tumbler. That wasn’t the look I wanted. I was hoping for something smoky. So, while the epoxy was still workable, I took a silicone brush and gently dragged it down the length of the cup through the inks. That broke the lines up into soft, wispy clouds of color.
Looking back, I could have used a little less ink, but I still love how it turned out. Remove the electrical tape before the epoxy fully sets, and let the first coat cure.
Step 4: Add a Holographic Name
Holographic vinyl can get lost on a busy background. To make the name pop, I layered it on a matte black backing cut slightly larger than the letters. Since the decal will be sealed under epoxy, it doesn’t matter whether you use Oracal 631 or 651 for the backing.
- Wipe the cured cup with alcohol, then let it dry thoroughly. Leftover moisture or oil can make vinyl lift.
- Find the best spot on the design for the name.
- Apply the black layer first, then the holographic layer on top, using transfer tape.
Step 5: Final Light Coat of Epoxy
Re-tape the rim with electrical tape, mix a small batch of epoxy, and brush on a light final coat with the cup turning. Let it cure fully before use.
Tips for Alcohol Ink Tumblers
- Start with less ink. You can always add more.
- Use a silicone brush to move ink if you don’t like the pattern.
- Save leftover epoxy in silicone molds for small resin pieces.
- Back holographic vinyl with black so it stays readable.
Frequently Asked Questions
How do I get a smoky alcohol ink effect?
Drag a silicone brush gently through the inks while the epoxy is still wet to break up stripes.
Will holographic vinyl show up on a colorful tumbler?
It can get lost. Layering it on a black backing makes it much easier to read.
More Epoxy Tumblers
See my marble and alcohol ink tumblers and mica powder tumbler. Subscribe to All DIY Crafts on YouTube.