Crafting a Sea Glass Dolphin Resin Art picture frames made of resin is such a fun new way to tap into your artistic side and show your creativity, even as a beginner in this art form! You’ll never run out of ideas, concepts, and inspiration while learning new techniques and projects to try.
What is Resin?
Resin art is considered the new generation’s versatile medium of unique painting styles, sculptural work, crafts, accessories, or even three-dimensional canvas. Resin is a synthetic material combined with a hardener for purely aesthetic purposes. Basically, there are two types of resin:
- Natural resin. This is a thick liquid excreted by plants for healing and protection. It is commonly used in jewelry, perfumes, varnishes, and lacquers. It can harden and transform into a transparent substance making it very expensive.
- Synthetic resin. This type is a viscous liquid that hardens into a plastic form. It is the most widely used form of resin usually made of silicone, polyester, and polyurethane. Synthetic resin should be mixed with a suitable hardener to start the curing process and make a crystal-clear glossy surface.
Surface Pour and Deep Pour Resin Art
For this particular project which is sea glass resin in a picture frame, we will be using the surface pour technique of resin art. Surface pour typically coats the surface of a mixed media or art piece that needs a shine or can be damaged.
It is used to complement or improve the artwork by adding a shine or protective coating. Deep pour resin art is not really for beginners because it can be challenging especially if you don’t know how to manage the material. It is usually used for castings or molds.
Benefits of Making a Sea Glass Resin Dolphin in Picture Frame
Making a sea glass resin dolphin in a picture frame can give you the summery beach vibes you will always look forward to during vacations.
Crafting your picture frame out of resin and displaying your photos will keep your memories with the sand, sea, and sun along with your encounter with sea animals like dolphins. You can also customize your frame based on the theme and style of your pictures.
This can be a potentially good small business, too.
How To Make Sea Glass Resin Dolphin in Picture Frame For Beginners
Materials Needed:
- The glass picture frame or wood frame (can be in different colors)
- Art Resin
- Clean paper and marker
- Sea glass (silver and blue), shells, stones, crushed glass or sand.
- Heat gun
- Glue gun and glue sticks
- Mixing Cups and sticks
- Clean gloves
- Respirator
- Goggles
Step by Step Process:
Preping the Frame
Prepare your work area. Cover your working area and ensure that it is free from dust with adequate ventilation. Prepare all the tools that you might need before measuring and mixing.
Measure how much resin you need. Wear disposable gloves to protect your skin. Measure accurately and check the manual to determine the correct ratio
Get your glass picture or wood frame (it can be a used one or an old one). You can also use frames with different colors.
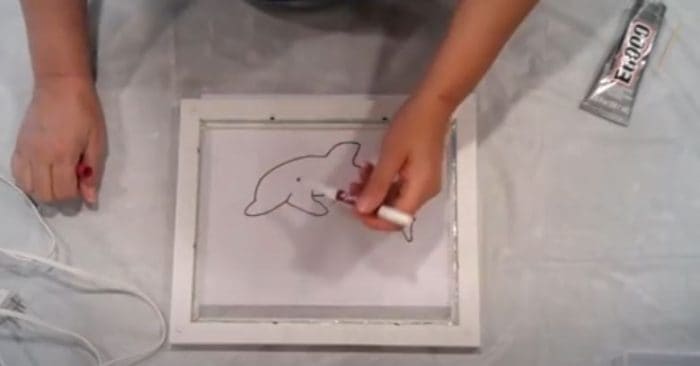
On clean paper, draw a silhouette or layout of a dolphin using a marker.
Remove the back of the frame and keep the glass on the frame. Place it on a clean table front side down.
Use a glue gun around the edges of the glass to keep it on the frame. Alternatively, you can use an E6000 glue which is thinner when it dries up. Make sure to cover all the edges so that the resin will not seep through. Use a cotton tip to smoothen out the glue or remove the glue on the glass and let it dry.

Place your dolphin silhouette drawing under the frame and position it depending on where you want it to be. Clean the inside of the glass from smudges then trace the drawing lightly on the glass using a dry-erase marker.
Flip the frame and put a clean paper inside the frame making sure not to erase the dry-erase marker drawing. This is done so that you can easily visualize the dolphin’s silhouette on the glass.
Preparing to pour the Resin
Prepare 40ml of art resin by mixing 20ml of part A and 20ml of part B. Mix the resin and hardener slowly until well blended to avoid excess bubbles.
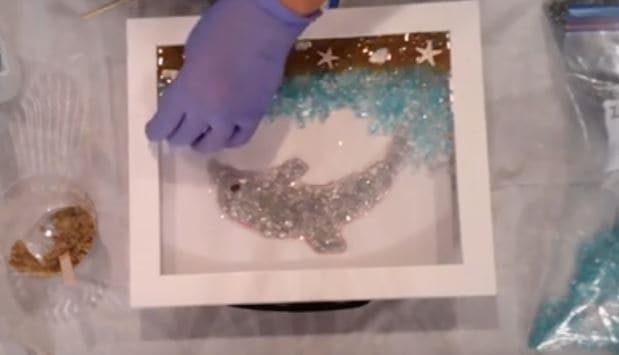
Start by pouring small amounts of resin inside the drawing, then put a small amount of silver sea glass to lay out the dolphin drawing. Make sure that your piece is dry and free from dust, and placed in a flat object to ensure entire coverage.

Put the sand at the bottom of the glass frame then pour small amounts of resin to cover the sand. Carefully place the shells and stones above the sand and let it dry.

Place the blue sea glass to look like water in the ocean, then pour small amounts of resin.
Remove air bubbles. Tiny air bubbles are common and usually pop on their own. You may also use a toothpick to pick out dust or hair with resin. To achieve a flawless and glass-like surface, you may quickly use a heat gun to remove the tiny bubbles.
Carefully wipe the dry-erase dolphin drawing under the glass and let it dry for four to five hours. Make sure to cover the picture frame while it cures to protect your piece from dust throughout the drying process.
Place the resin art in a dust-free space or cover it with a cardboard box for at least 24 hours where it will be 95% cured.
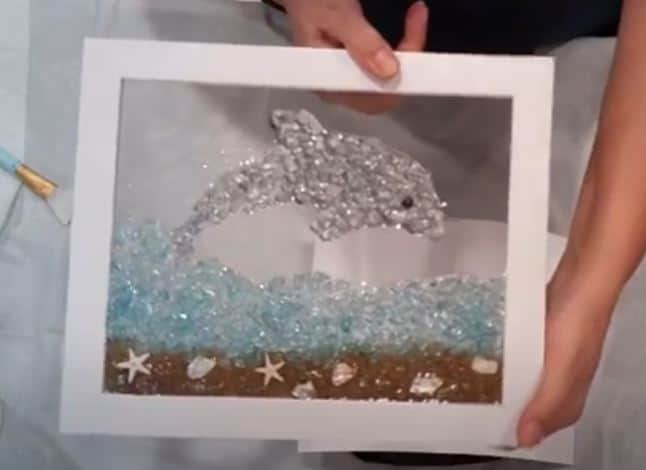
That’s it! Your beautiful sea glass resin dolphin in picture frame is ready for display.
In Conclusion
Nowadays, resin art has become a very popular yet unique medium to express feelings and concepts. It is also a niche with large business potential for entrepreneurs with small businesses.
So whether it’s for your new hobby or a novel business start-up, try resin art – a very simple and versatile medium that can give you endless creative ideas.