
A black tumbler makes the perfect night sky for a galaxy design. In this galaxy glitter nurse tumbler tutorial, I’ll show you how I mixed neon Stardust micas and fine silver glitter into epoxy, used a heat gun to move the colors, tapped on dry mica for little “stars,” and finished it with a green holographic name and “RN.”
As an Amazon Associate I earn from qualifying purchases. Some links in this post are affiliate links, so I may earn a small commission at no extra cost to you.
Supplies You Need
- Stainless steel tumbler spray painted black
- Stardust micas in bright colors (I used Purple Orchid, Cosmic Blue, and a neon green)
- Fine silver glitter
- Tumbler epoxy
- Small silicone cups (about 15 ml each) and popsicle sticks
- Tumbler turner, silicone brush, and heat gun
- Cricut, holographic vinyl, and transfer tape
Step 1: Thin Base Coat of Epoxy
With electrical tape on the rim and the black cup turning, brush on a small, clean coat of epoxy. A silicone brush lets you feel dry spots that you’d miss with your fingers, so you get better coverage.
Step 2: Mix Bright Micas and Glitter Into Epoxy
Pour a little epoxy into each small cup, saving the rest for another project. Add mica to each cup and stir with half a popsicle stick until there are no clumps.
Pick the brightest micas you can. On black, even pretty colors can look dark. My blue looked almost too dark at first. Adding a little fine silver glitter to each color made them pop much more than I expected. That was the trick that made this galaxy work.
Drizzle the colors onto the turning cup, leaving some black showing. That negative space is what makes it look like space.
Step 3: Move the Colors With a Heat Gun
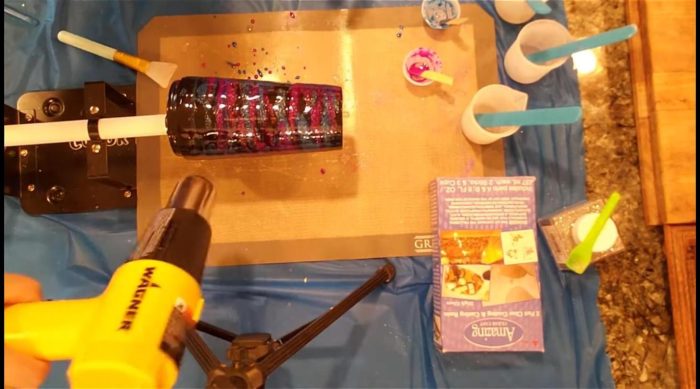
As the cup turns, sweep the heat gun back and forth. The heat moves the colors into each other and creates the swirly galaxy effect. Then I very lightly sprinkled a touch of extra glitter on top with my fingers.
Step 4: Tap On Dry Mica for Stars
While the epoxy was still wet, I dipped a clean fingertip in dry neon green mica and gently tapped it onto the cup. Hit those spots with the heat gun so they sink into the epoxy a bit. Those little green speckles look like distant stars, and they matched the holographic vinyl perfectly. Let the cup spin four to five hours.
Step 5: Design the Name
These cups fit a design about 4 inches by 2 inches. In Cricut Design Space:
- Type the name in Quirky Script and tighten the letter spacing.
- If two letters overlap awkwardly, click Ungroup and nudge one with your arrow keys, then select all and click Weld.
- Add “RN” in a block font (I used Quiroh Heavy) underneath.
- Select everything and click Attach so it cuts exactly as laid out.
- Don’t mirror, since this is adhesive vinyl.
Step 6: Apply and Final Coat
Apply the holographic vinyl with transfer tape, starting at one end and rolling it on. Add one more coat of epoxy and let it cure for 24 hours.
Frequently Asked Questions
How do you make mica show up on a black tumbler?
Choose the brightest micas available and mix in a little fine silver glitter to boost the color.
How do I add star speckles?
Tap dry mica onto wet epoxy with a fingertip, then hit it with the heat gun.
More Nurse Tumblers
See my DIY nurse tumbler guide and marble and alcohol ink tumblers. Subscribe to All DIY Crafts on YouTube.